Configuring Lets Encrypt SSL Certificates for use on Palo Alto Firewalls

To get started we will install acme.sh:

curl https://get.acme.sh | sh

Next we will use acme.sh to issue the certificates:

./acme.sh --issue -d [domainname] -d [subdomain.domain] --dns --yes-I-know-dns-manual-mode-enough-go-ahead-please

Once the above command runs, the output will include a list of txt records to be added to dns for each domain and sub-domain on the certificate.  Add the required txt records to public DNS and wait for them to propagate.  Next, run the below command to generate the certificates:

./acme.sh --renew -d [dominname] -d [subdomain.domain] --yes-I-know-dns-manual-mode-enough-go-ahead-please

This will verify the txt records and proceed to issue your certificate.  The certificate will be in the output as well as paths to the cert, key, intermediate and full chain.

Browse to the folder named the same as the domain you requested the certificate for and find you’re new certificates.

Finally, we will use OpenSSL to create the pfx file needed to upload to the Palo Alto firewall:

openssl pkcs12 -export -out certname.pfx -inkey keyname.key -in certname.cer -certfile ca.cer

When prompted, enter and confirm a password for the new PFX file.  You can now take this newly created pfx file and upload it to the firewall.

Calibrate Z Offset with Klipper


Before starting with Z Offset calibration, please make sure the bed is level following the steps in this article

To calibrate the Z offset with Klipper and BLTouch, we first start by homing all axis:

G28 #home all axis

Next we will send a probe calibrate command to tell the printer we want to calibrate the Z axis:

PROBE_CALIBRATE

Once this command is entered the printer will attempt to discover the Z offset and report back what it thinks it should be:

Z position: ?????? –> 6.025 <– ??????

We than need to start the manual calibration steps.  Grab a piece of paper and slide it between the nozzle and print bed and start lowering the nozzle until you feel a slight resistance when moving the paper back and forth.  To lower the nozzle enter the below command.  Adjust the value and repeat until you feel a slight resistance:

TESTZ Z=-.1

Once you feel a slight resistance, type accept to save your values:

ACCEPT

bltouch: z_offset: 1.099
The SAVE_CONFIG command will update the printer config file
with the above and restart the printer.

Now type SAVE_CONFIG and restart the printer to load the new config.

Next we need to verify the accuracy of the new settings.

G28 #home all axis

PROBE_ACCURACY

The printer will now run a series of tests to verify the repeatability of the probe results.

probe accuracy results: maximum 1.104000, minimum 1.091500, range 0.012500, average 1.099500, median 1.100250, standard deviation 0.004717

We are looking for a range of 0.0125 or better, but not worse than 0.025.  The Z Height is now calibrated.  For additional reading please reference the Klipper docs

Tagged ,

Klipper Bed Leveling With Screws Tilt Adjust And BLTouch Probe

Leveling your print bed is easy using Klipper and a probe such as the BLTouch.  First we need to verify the locations of the bed leveling screws are defined in your Klipper config:

[screws_tilt_adjust]
horizontal_move_z: 5
screw1: 70,213
screw1_name: back left
screw2: 235,213
screw2_name: back right
screw3: 70,47
screw3_name: front left
screw4: 235,47
screw4_name: front right

If this has just been added issue a restart so Klipper loads the new config.  Once Klipper is back online, we want to send a few commands to the terminal:

#Home All Axis

G28

#Adjust Bed Level

SCREWS_TILT_CALCULATE

The probe will now go the locations defined in the Klipper config file and probe for the distance to the bed.

In the terminal you will see the probe results and they will be followed up with something similar to the output below:

// front right : X 235.0, Y 47.0, Z 1.60750 : Adjust -> CW 00:02
// front left : X 70.0, Y 47.0, Z 1.65250 : Adjust -> CCW 00:04
// back right : X 235.0, Y 213.0, Z 1.58625 : Adjust -> CW 00:04
// back left (Base): X 70.0, Y 213.0, Z 1.62250

Adjust the bed according the output for each corner.  Once complete, run the SCREWS_TILT_CALCULATE command again and repeat the process until you are happy with the results.

From here you can proceed with issuing another G28 to home all axis and follow on with a calibration using BED_MESH_CALIBRATE

Tagged ,

Horizon View Client DPI Scaling

I recently ran across an issue with the Horizon View client, on a Surface Pro 3, where the icons and text were so small they were unreadable. I tried the usual fix of checking the disable display scaling on high DPI monitors checkbox, but to no avail. This check box has helped in the past, but isn’t fixing the issues with VMware Horizon View client.

VMware has a registry key that can be added to fix this issue once and for all. This key only works with the 3.4 version of the Horizon View client and enables an experimental DPI Scaling feature.

KEY: HKCU\software\vmware, inc.\vmware vdm\client
Value:  DWORD:  EnableSessionDPIScaling 1

1 = on
0 = off

With this key added, when you connect to a desktop, the screen scales properly.

Adjusting Windows 7 DPI Settings via Registry

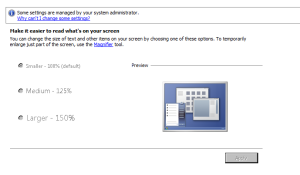
In Windows 7, Microsoft has provided us with an option to adjust the size of icons and text on the screen. Normally this is accessed by going into display properties and choosing smaller, medium or larger. These settings are commonly disabled by policy so users cannot adjust them.

Display Settings

Even with these options disabled, these can still be adjusted per user via the registry or Group Policy Preferences. The registry key is applied at login, so the user will need to log off and back for the change to take effect.


Key: HKCU\Control Panel\Desktop   
Value:  DWORD: LogPixels
Smaller (100%) = 96 (decimal) = 60 (HEX)
Medium (125%) = 120 (decimal) = 78 (HEX)
Larger (150%) = 144 (decimal) = 90 (HEX)

Whitelisting and Blacklisting Sites in Chrome Via GPO

The Google Chrome browser has Group Policy extensions available for managing computer and user settings for the chrome browser via group policy.

These settings include enabling/disabling default browser prompts and settings, controlling password manager, chrome apps settings and numerous other items.

The ones we’ll look at today are whitelisting and blacklisting websites via GPO.

To start, make sure you have the Chrome admx and adml files downloaded. They can be downloaded from Google:

http://dl.google.com/dl/edgedl/chrome/policy/policy_templates.zip

This zip contains HTML listings of the policy settings, linux templates and windows templates. The windows templates come in two flavors. adm and admx. For the admx template:

Copy chrome.admx to SYSVOL\domain\Policies\PolicyDefinitions\ 
Also copy the appropriate adml language file to the subfolder for your language

Chrome processes policies in the order of Machine –> User –> Chrome

When you launch Group Policy Management Console, and edit a policy, expand Administrative templates under either user or computer configuration and you’ll now see a folder titled Google. When you expand this folder, there are two options. Google Chrome or Google Chrome default settings. The defualt settings allow you to set default settings but allow end user over riding of these policy settings.

The other option enforces the settings defined in the policy with no ability to override.

In the Google Chrome policy, there are two options related to white listing and black listing of sites. They are “Block access to a list of URLs” and “Allow access to a list of URLs”. Both of these settings are available at the user and computer/machine level.

These settings take a list of urls or can take the wildcard *

To block all sites and only whitelist the ones you want, set “Block access to a list of URLs” to enabled and add * to the list.

Next, go to “Allow access to a set of URLs” click enable and add the sites you want to the list.

Example: 
 https://www.google.com
https://translate.google.com
etc...

In the background, these are setting registry values at the following locations:

SOFTWARE\Policies\Google\Chrome\URLBlacklist 
SOFTWARE\Policies\Google\Chrome\URLWhitelist

These are added as strings in numerical order.

1 REG_SZ https://www.google.com 
2 REG_SZ https://translate.google.com

Once you have the settings how you like them, close the editor,complete any other GPO related tasks such as security filtering and attach to the appropriate OU.

Now you have Chrome filtered to only allow whitelisted sites or whatever combination of whitelisted and blacklisted sites you desire.